Aeries: Data Confirmation Guide
Sign in to Aeries Parent Portal to complete Data Confirmation
How to Complete the Annual Data Confirmation Process
Log In to Your Aeries Parent Portal
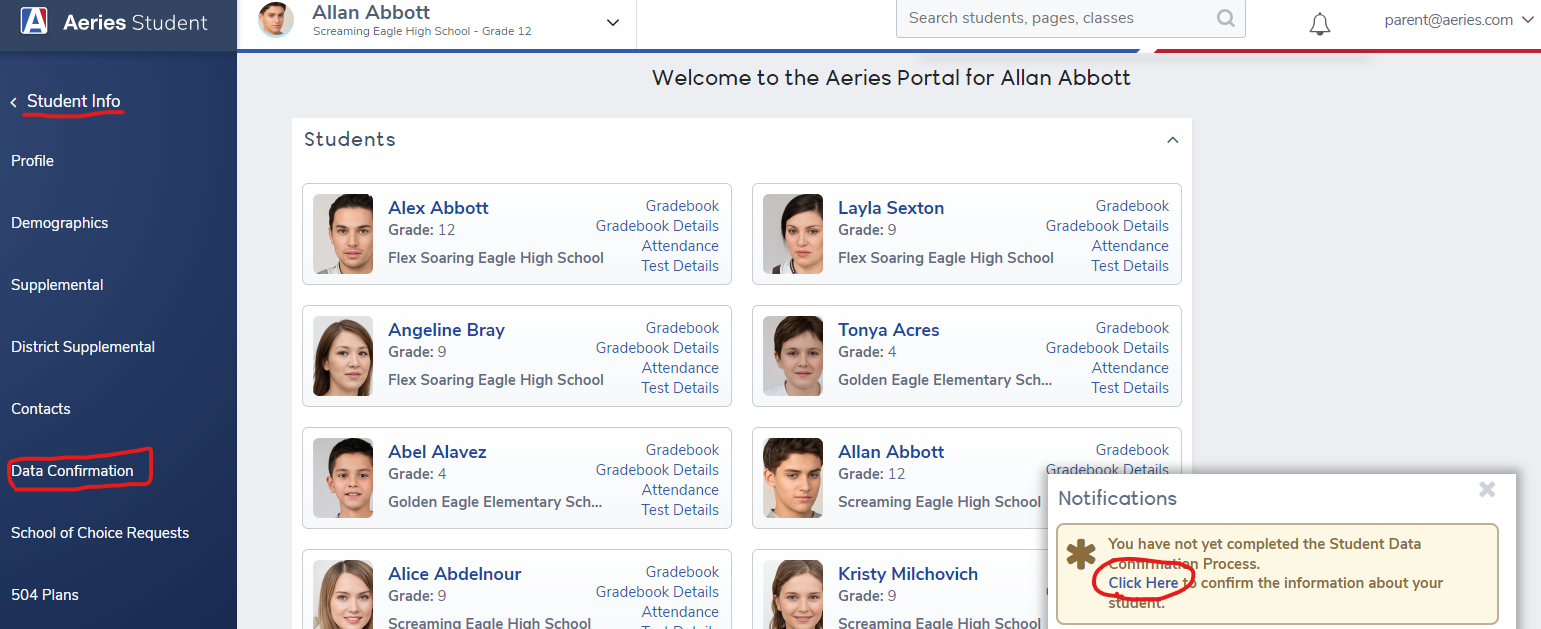
After logging in, a pop-up message will prompt you to begin the Data Confirmation process. Click the "Click Here" link in the pop-up window or access it from the menu by selecting Student Info > Data Confirmation.
Complete Data Confirmation for Each Student
The Data Confirmation process must be completed separately for each student enrolled in PVPUSD. To switch between students, see the instructions in Aeries: Data Confirmation for Multiple Students.
Steps to Complete Data Confirmation
The process includes 8 tabs. You must complete each one before moving on to the next. A checkmark will replace the step number when it’s finished.
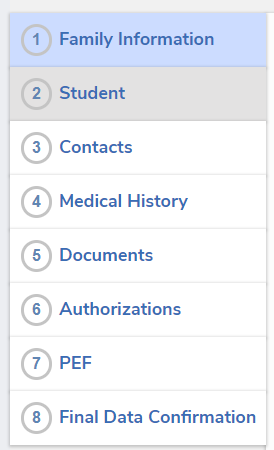
Step 1: Family Information
- Respond to each required questionnaire.
- Click Confirm and Continue when done.

Step 2: Student
- Review the displayed information.
- Click Change to update any data.

- Click Confirm and Continue when done or if no changes are needed.
Step 3: Contacts
- Review contact information.
-
Important: Do not delete or modify existing contact records unless necessary, as this may cause issues with student records.
- To add a new contact, click Add.

- To update a contact, click the pencil icon, make changes, and click Save.


- Click Confirm and Continue when done.
Step 4: Medical History
- Review the listed medical conditions.
- To remove a condition, click No Longer Applies.

- To add or update conditions, click the relevant fields, provide details, and click Save.
- Click Confirm and Continue when done or if no changes are needed.
Step 5: Documents
- Open each document or link (a new tab will open for each).
- Review all documents. Once all are shaded green with checkmarks, click Confirm and Continue.
Step 6: Authorizations
- Select a response (required) for each authorization

- Click Save, then Confirm and Continue.
Step 7: PEF
- Review the PEF (Peninsula Education Foundation) information.
- Click the button/link to review and finalize the PVPUSD registration process.

- Click Confirm and Continue.
Step 8: Final Data Confirmation
- Review your responses by clicking on any tab if needed.
- Once ready, click Finish and Submit.
The Final Data Confirmation will display "Thank you for confirming the student data in the system" acknowledging completion of Data Confirmation with specific information about/for the school including forms/packs, PTSA, etc.